Showing posts with label Disney at Home. Show all posts

Friday, January 22, 2016

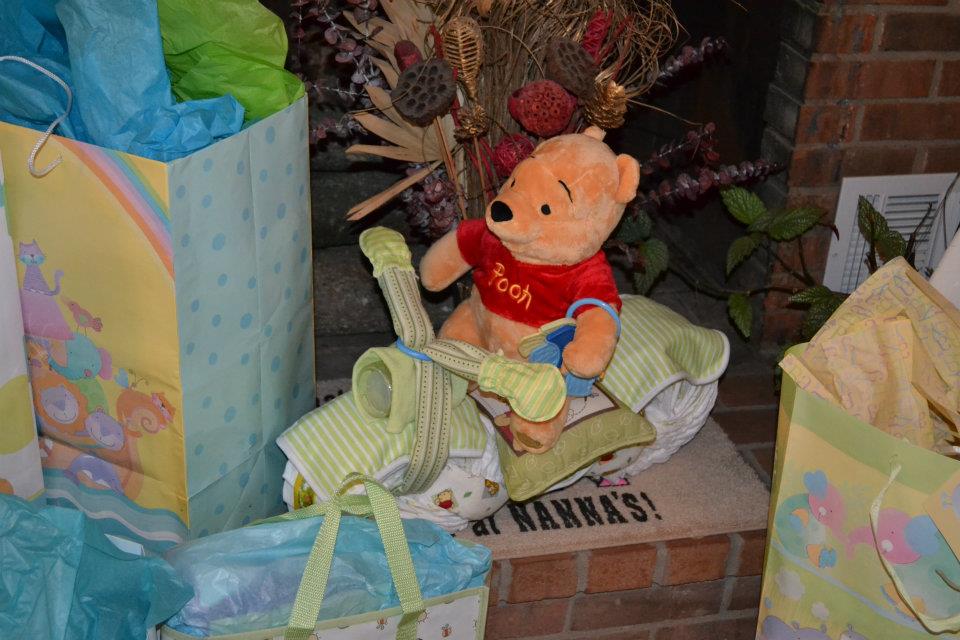
Winnie the Pooh Diaper Cycle

As a Flashback Friday today, I thought I'd share a diaper cycle I made for my sister's shower a few years ago. Baby M's nursery theme was Winnie the Pooh which made decorating for the shower pretty easy (and absolutely adorable).

My dad and his wife ride Harleys, so my Pooh themed diaper cycle was a big hit.

This little project was definitely Pinterest Inspired. I came across two diaper cycles that I really liked. While the two looked about the same, I noticed they had a couple small differences in assembly. I kind of merged the two together to come up with my final masterpiece ;-)

The folks who first created these, and posted the instructions for all to see, deserve the credit for these little creations, and they certainly do a better job of showing you how to do it. So, head to those blogs for detailed instructions. The sites are www.sweetaprils.com and www.baby-shower.com but you can find the specific instructions here and here.

Here's what you need if you're going to make your own:

  • About 40 Size 1 diapers (as a mom, I prefer Pampers Swaddlers)
  • Two cloth bibs (I used burp cloths)
  • One washcloth
  • Two (or three, depending which design you prefer) receiving blankets in like colors (I did three)
  • A pair of baby mittens or socks (I used mittens)
  • One bottle
  • One (or two, again depending on which you do) of the baby chain link toys
  • Ribbon to wrap around the "tires"
  • Stuffed animal of your choice
Optional items I used to add a little fun:
  • Toy keys
  • Birth announcement pillow for seat
Make sure to coordinate your blankets, bibs, and wash cloths to keep things looking clean. I used Winnie the Pooh receiving blankets to go along with my theme. The blankets and the pillow had some green, so that's what I chose to use for the fabric pieces. On www.sweetaprils.com you can see several examples of coordinating colors and themes.

I used the "tires" from one because I liked the look of them better. Putting them together in the round pans like this just made them look a little neater I think.

Since I found the Winnie the Pooh birth announcement pillow and thought it would make the perfect seat I decided to use the other's instruction for connecting them with the blankets because it left a little more room between the tires. Both had the same concept for the handlebars, headlight, and "fenders". Oh, and one used elastic instead of ribbon to wrap the tires. While I think that was pretty practical and kept a better hold of the diapers, I like the look of the ribbon better. I ended up using a wide solid ribbon and then layering a thinner Winnie the Pooh printed ribbon over it.

Here's the final product!


 And here are a few photos from the shower :-)

I loved the clothesline with the baby items! Such cute decor!
Her cousin made a cute diaper cake and a plaque for his room with a quote from Winnie the Pooh

Again, the motorcycle was a big hit!

Pooh bath toys floating in the punch


This post carries a disclosure Level of 0. Please see my disclosure page for more details.

Tuesday, March 24, 2015

Silhouettes on Main Street

One of the things you'll need to prepare for when visiting Walt Disney World, or any of the Disney Destinations for that matter, are the onslaught of souvenir shops and merchandise for you to enjoy, peruse, and purchase! As you can imagine they've covered everything from stuffed animals and toys to kitchen gadgets and home decor and just about anything in between. I've come home with many 'o trinket and bobble, but my all-time favorite Disney souvenir by far is the Silhouette we had done back in 2011 on Main Street in Magic Kingdom.

While waiting for the Main Street Electrical Parade to begin we found Jim tucked in a nook on Main Street, hot, but waiting patiently for someone to come along so he could get to work. My daughter plopped down first and Jim's busy little scissors came alive at the guidance of his steady hand. It was amazing to see Tessa's profile come out of this white paper so quickly and easily. 
Colten was a little smaller then, and he was pretty pooped by this point in the evening. He chose to sit in my lap as Jim worked on his profile. That didn't bother Jim any, and neither did the pacifier in his mouth.
What an awesome talent. Jim was very polite, but very focused on what he was doing. It amazed me how quickly his hands whipped around to pull my children's faces from that plain paper. 
You have the option to take the silhouettes as is or have them framed. The oval frames are perfect, and they weren't that expensive so I opted to have it done there.
Oh, and I'm not quite sure how or why it worked out that way, but since there were two kids I got two copies of each of their silhouettes. Which was perfect because I was able to give Grandma & Grandpa one, too!
And the finished product!
For only $34 we got two framed silhouettes of both children. Money well spent in my opinion!

Poor Jim, it was sooo hot!! He was so nice though. I'm not sure the policy, but we tipped him for his work. Personally I believe this is a craft worth tipping, but of course to each his own :-) I still can't get over how much they resemble my children. He got my little Colten down to a T!! 

This is by far my favorite souvenir! We may lose some trinkets along the way, or outgrow the stuffed animals or characters (dare I say! some of us never will), but regardless, these silhouettes will be something we'll forever cherish!

Have any of you done the Silhouettes on Main Street? Is it something you'll be looking for on your next trip? I'd love to see them. I'd love for you to head to my Facebook page and share your photos with me!


This post carries a disclosure Level of 0. Please see my disclosure page for more details.